I have extended the I2S interface in Mozzi, so that we can can use the getAudioInput() which reads the audio via I2S: This can be used e.g. by the AudioKit. Until this change has been merged, you need to use my extended project.
Mozzi brings your Arduino to life by allowing it to produce much more complex and interesting growls, sweeps and chorusing atmospherics. These sounds can be quickly and easily constructed from familiar synthesis units like oscillators, delays, filters and envelopes.
The AudioKit is a cheap ESP32 based audio board that usually uses an ES8388 audio chip. This chip needs to be configured via I2C before it can be used.
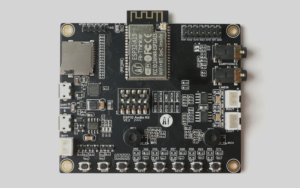
If you want to use Mozzi with the AudioKit you still have a pretty easy way to deal with this using my audio-driver library directly.
So here are the steps that are necessary:
Select Your Board
There a quite of few different variants out there with different audio chips and different pin assignments.
Mozzi Configuration for the ESP32
Make sure that Mozzi is using I2S with a DAC and ADC and the correct pins. This is done in AudioConfigESP32.h by using the following settings:
 // Set output mode
#define ESP32_AUDIO_OUT_MODE I2S_DAC_AND_I2S_ADC

// For external I2S use I2S pins of your AudioKit
#define ESP32_I2S_BCK_PIN 27
#define ESP32_I2S_WS_PIN 25
#define ESP32_I2S_DATA_PIN 26
#define ESP32_I2S_DATA_PIN_IN 35
You can determine the relevant pins for your model by consulting this table.
Using the Codec
In the sketch you need to set up the audio chip of the AudioKit: We need to provide the sample rate and select the correct board object to initialize (See AudioBoard in Variables section of the documentation):
  // setup of AudioKit codec
  CodecConfig cfg;
  cfg.input_device = ADC_INPUT_LINE2;
  cfg.output_device = DAC_OUTPUT_ALL;
  cfg.i2s.bits = BIT_LENGTH_16BITS;
  cfg.i2s.rate = RATE_32K;
  AudioKitEs8388V1.begin(cfg);
Unfortunately the input device selection of the es8388 based AudioKits does not work because of a hardware bug and you get the input both from the microphones and the aux in. The LyraT boards however work correctly!
The Complete Arduino Sketch
We just copy the data from the output: This Sketch works on an AudioKit or LyraT board:
#include <MozziGuts.h>
#include "AudioBoard.h"

void setup(){
  CodecConfig cfg;
  cfg.input_device = ADC_INPUT_LINE2;
  cfg.output_device = DAC_OUTPUT_ALL;
  cfg.i2s.bits = BIT_LENGTH_16BITS;
  cfg.i2s.rate = RATE_32K;
  AudioKitEs8388V1.begin(cfg);

  startMozzi();
}


void updateControl(){
}


AudioOutput_t updateAudio(){
  int asig = getAudioInput(); // range 0-1023
  asig = asig - 512; // now range is -512 to 511
  // output range in STANDARD mode is -244 to 243,
  // we scale down only by one bit, so you might need
  // to adjust your signal to suit
  return MonoOutput::fromAlmostNBit(9, asig).clip();
}


void loop(){
  audioHook();
}
and you get the proper int16_t values !
7 Comments
Jaap Noordzij · 24. February 2024 at 15:33
I suppose it would be possible to use Mozzi with your new audio_driver library instead of your (deprecated) arduino_audiokit library. I love your approach but I am a beginner, could you give me some hints ?
pschatzmann · 24. February 2024 at 16:26
I have updated the post…
pschatzmann · 24. February 2024 at 16:29
https://www.pschatzmann.ch/home/2023/02/25/using-the-audiokit-library-with-mozzi/
Jaap Noordzij · 25. February 2024 at 8:36
Great, works, thank you.
Jaap Noordzij · 26. February 2024 at 12:05
I try to limit the volume. I can do this in Mozzi by manipulating the “gain” but I am curious how to do this with the AudioBoard. There is a method called setVolume but when I use like below the program crashes. What am I missing ?
AudioKitEs8388V1.setVolume(0.8);
AudioKitEs8388V1.begin(cfg);
pschatzmann · 26. February 2024 at 12:14
I think this has been fixed in the actual version. It was always working, if you call it after begin() and with the latest correction it will also work if you call it before.
Jaap Noordzij · 26. February 2024 at 12:54
You you are right, it works but I should use an integer (80) and not a float (0.8)
I just tried the same sketch on a standard ESP32-Devkit with a little MAX98357A board and it works fine as well (obviously you would probably say, it’s just an external DAC 😉