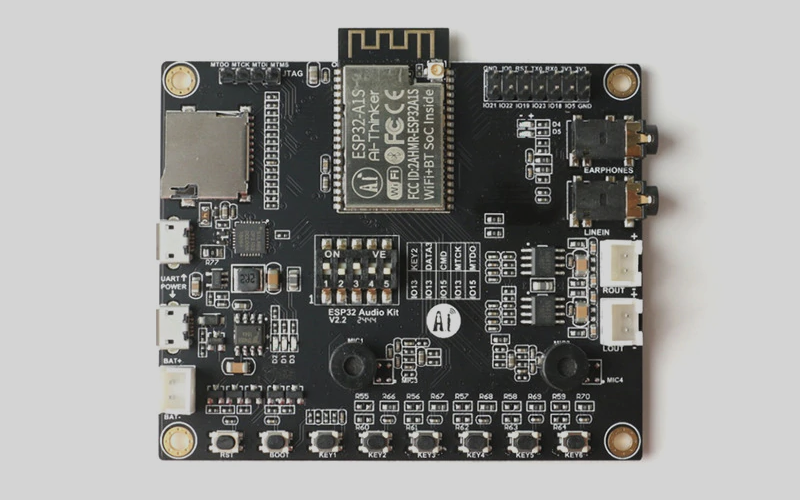
I found some cheap AI Thinker ESP32 Audio Kit V2.2 on AliExpress and because I was tired of all the wires I had to connect to implement my different scenarios that are possible with my Arduino Audio Tools Library, I thought it to be a good idea to buy this board.
I am aware that this board, like the corresponding LyraT alternatives from Espressif are mainly used with the IDF/ADF framework, but I wanted to use it with Arduino, and that’s where the problems started: First I was so naive to just deploy one of my Bluetooth A2DP Audio sketches. It was running somehow – but there was no sound! Next I tried out the SD drive – and here again – the SD drive was not available.
I am documenting here the solutions to make things work for my V2.2 3478 Board:
The SD Card
The AI board like the LyraT boards are using some unusual pin assignments and you need to initialize SPI by indicating the correct pins.
In addition you need to make sure that the DATA3 and CMD on-board switches are in the on position:
#define PIN_AUDIO_KIT_SD_CARD_CS 13
#define PIN_AUDIO_KIT_SD_CARD_MISO 2
#define PIN_AUDIO_KIT_SD_CARD_MOSI 15
#define PIN_AUDIO_KIT_SD_CARD_CLK  14

SPI.begin(PIN_AUDIO_KIT_SD_CARD_CLK, PIN_AUDIO_KIT_SD_CARD_MISO, PIN_AUDIO_KIT_SD_CARD_MOSI, PIN_AUDIO_KIT_SD_CARD_CS);
Then when you set up the SD library you need to indicate the PIN_AUDIO_KIT_SD_CARD_CS as CS pin. That was the easy one – no let’s move to the major challenge:
Output to the Speakers
The board uses a ES8388 audio chip that is connected via I2S, so we need to use the correct I2S pin assignments. Note that these are different from the LyraT ones!
#define PIN_I2S_AUDIO_KIT_MCLK 0
#define PIN_I2S_AUDIO_KIT_BCK 27
#define PIN_I2S_AUDIO_KIT_WS 25
#define PIN_I2S_AUDIO_KIT_DATA_OUT 26
#define PIN_I2S_AUDIO_KIT_DATA_IN 35
The audio chip is responsible for routing the output or input to the correct final device and controlling the volume. The ES8388 must be programmed via I2C! In order to do this I found this solution from thaaraak which inspired me to try to convert the original ADF driver from Espressif, so that it can be used in Arduino.
Here is the necessary information for the I2C connection:
#define I2C_MASTER_NUM I2C_NUM_0 /*!< I2C port number for master dev */
#define I2C_MASTER_SCL_IO 32
#define I2C_MASTER_SDA_IO 33
#define ES8388_ADDR 0x10
Finally, here is a link to the ES8388 user guide.
Headphone Detection
I was testing the headphone detection with the following logic:
#define HEADPHONE_DETECT 39

bool headphoneStatus() {
  return !gpio_get_level((gpio_num_t)HEADPHONE_DETECT);
}
If no headphone is connected the gpio_get_level() returns 1 – with a headphone the output changes to 0 – so I confirm that on this board we need to use GPIO 39.
Please note that the pin must be set up to be pulled high.
Enable Power Amplifier
The power activate pin for the speakers is identical to the LyraT boards:
#define PA_ENABLE_GPIO 21
We can use this pin together with the headphone detection pin to activate/deactivate the speaker
  void processKeys() {
    LOGI(LOG_METHOD);
    static unsigned long keys_timeout = 0;
    if (keys_timeout < millis()) {
      if (cfg.is_headphone_detection) {
        LOGI("process headphone detection");
        bool isConnected = headphoneStatus();
        bool powerActive = !isConnected;
        if (powerActive != actualPower) {
          LOGW("Headphone jack has been %s",
                   isConnected ? "inserted" : "removed");
          setPAPower(powerActive);
        }
      }
      keys_timeout = millis() + KEY_RESPONSE_TIME_MS;
    }
  }
Conclusions
I have the solution working now and I can share my Audio Player Sketch that I used for my tests. It is based on my arduino-audio-tools project:
The Arduino Audio Player Sketch
#define USE_SDFAT
#define USE_HELIX
#include "AudioTools.h"
#include "AudioLibs/AudioKit.h"

const char *startFilePath="/";
const char* ext="mp3";
AudioSourceSdFat source(startFilePath, ext, PIN_AUDIO_KIT_SD_CARD_CS);
AudioKitStream kit;
MP3DecoderHelix decoder;
AudioPlayer player(source, kit, decoder);


void setup() {
  Serial.begin(115200);
  AudioLogger::instance().begin(Serial, AudioLogger::Info);

  // setup output
  auto cfg = kit.defaultConfig(TX_MODE);
  kit.begin(cfg);

  // setup player
  player.begin();
}

void loop() {
  player.copy();
  kit.processActions();
}
Yes – I just needed to replace the I2SStream with the AudioKitStream and that’s pretty cool!
If you add the kit.processActions() in the loop you get the automatic headphone detection and volume control working.
Unfortunately the output is quite distored mainly for the loud parts. We can take care of this by reducing the signal strength (volume) that we send to the kit by adjusting the volume of the player with player.setVolume(0.7);
The full example can be found on Github
Dependencies
Disclaimer
Please note that the sketches that I am posting on this site are working at the point of time of the posting. It might be that things have changed when you read this. So please use the corresponding updated example in the Audio Tools Project if you want to try it out yourself.

20 Comments
TT · 2. June 2025 at 2:57
Hi,
when I start with this Board in ArduinoIDE, do I have to install a board manager other than the usual Arduino-ESP32 Board Manager? And which board do I have to select? The AI Thinker audio kit is not in my list.
thanks
pschatzmann · 2. June 2025 at 6:10
Just use the generic ESP32 Dev Module that works for all ESP32!
Fabian · 14. December 2024 at 1:47
Hi Phil,
thank you so mcuh for your hard work. I used it to build an mp3-Player with the audio kit. However, the audio quality is pretty poor as there are constant pauses every 1/10s. I have been playing with buffer size ans sample rate but couldn’t get it working properly. Have you experienced a similar problem and do you have any suggestions to solve it?
Many thanks!
Fabian
pschatzmann · 14. December 2024 at 10:17
No, my player works like a charm. Please use the example code from the AudioTools project and communicate via Github as described in the Readme!
This website is not for discussions or issues!
darz82 · 6. March 2024 at 7:52
Hello, I’ve recently purchased a ESP32-A1S board and I want to be able to play audio through ceiling speakers, with an ultimate goal being multiroom audio, now I think I’ll need to add an external amplifier to do this, can someone explain to me how you go about connecting an external amplifier to this board and driving higher wattage speakers.? Cheers
pschatzmann · 6. March 2024 at 8:24
Just connect the AUX out with the input of your amplifier: You might need an adapter cable.
Facu · 4. July 2023 at 23:02
I would like to ask about something very little, it’s about the LED’s D4 and D5. Could you know what GPIO’s are related to them? Many thanks in advance. Your work it’s phenomenal!
Cheers!
pschatzmann · 8. July 2023 at 15:47
Not sure of this is available: why don’t you look it up in your board definition: https://github.com/pschatzmann/arduino-audiokit/tree/main/src/audio_board
Clint Davis · 27. March 2023 at 19:04
Hello Phil, I thank you very much for your hard work!
I’ve been trying to use the Audiokit to flash two of these boards, unfortunately my boards just say Version 2.2 A237.
I would really like to create an AAC webserver for my network, and then another board to stream it.
When I flash the Webserver, it will join my network, and I can go to the page and start a stream, it takes a second, but unfortunately there is no Audio… I have confirmed the input.
I have verified that DIP switch 2 and 3 are on with the others off and I have also tried the other two settings for the board in your file, but the first AI thinker is the only one that starts a server.
Have you possibly got any ideas what could be wrong, or where to start?
Thank you for any help!
Clint
pschatzmann · 27. March 2023 at 19:15
The dip switches have no impact in this scenario.
I would start with the WAV and move to a more complex encoder only after this is working.
Don’t forget to define the input device cfg.input_device = AUDIO_HAL_ADC_INPUT_LINE2;
Clint Davis · 1. April 2023 at 13:33
Thank you for your reply. I’ve tried several different things, your example sketch streams-audiokit-webserver_aac.ino seems to define LINE2 but I still have no sound. The WAV Streamer example tries to save a file as soon as I go to the webpage. I cannot find anything at all that will play it or anything I can download to go stream it. I’m kind of at a loss. I’ll try to host a streaming service on a computer and see if I can play it with one of these examples.
pschatzmann · 1. April 2023 at 13:37
This is not the right place for these kind of comments. Please open a discussion on Github
https://github.com/pschatzmann/arduino-audio-tools/discussions
Alwin · 2. January 2023 at 19:08
Board in picture uses AC101 chip instead of 8388….Hence the A1S in the name…
pschatzmann · 9. January 2023 at 21:37
Check out the pictures at https://github.com/Ai-Thinker-Open/ESP32-A1S-AudioKit.
There you see that AC101 can also be using a 8388!
T. H. · 8. March 2022 at 22:25
I tried this with AudioKit 2.2. with ES8388, but
a) only headphone jack insertion is detected, not removal
and
b) volume is very low for headphone and speaker. I coud fix this, but only for speaker, by changing some lines in es8388.c es8388_set_voice_volume, as depicted here: https://github.com/AI-Thinker-Open/ESP32-A1S-AudioKit/issues/26
Do you have any idea how to fix headphone jack detection and headphone volume?
I read somewhere that several AudioKit variants with ES8388 exist, using different pins for I2C/I2S, did you take this into account in your code?
pschatzmann · 9. March 2022 at 9:05
I am not aware that different pin variants exist for the AudioKit with ES8388. However there is a variant with the AC101 which is totally different not only with the pins. As you can see in the readme of the AudioKit project, I am supporting both – but please note that depending on the functionality you want to use you might run into different pin conflicts: e.g. on the AC101 you can’t use the headphone detection if you use the SD.
I did not hear any issues with a low volume – on the contrary for me it was too loud. But please notice that the AudiKitStream class provides it’s own methods for managing the volume: The initial value is set to 40, but you can change this by calling the setVolume() method.
I could reproduce your issue with the headphone detection which was introduced when I extended the button handling logic.
For further discussions please use the issues or discussions on Github.
Alwin · 2. January 2023 at 19:21
Pins on each differ only a little…Only 2 pins are different….NC on 8388 (not connected) are SPORP en SPOLP on AC101….That’s it…..
pschatzmann · 9. January 2023 at 21:27
On the pinout of the basic module you might be right: But the inputs of the different audio boards are a big mess: See https://github.com/pschatzmann/arduino-audiokit/wiki/GPIO-Overview-by-Selected-Board
Vladimir Kozlov · 6. January 2022 at 13:57
Hello Phil, I just tried your library for Audio Kit and it works great! By the way, do you have any information regarding on-board microphones, i.e. sensitivity, noise level, etc.? I’m thinking about measuring sound level pressure using this board, but to calculate dB values I need some data about microphones, and there are no any info for this nor in Ai-Thinker docs, nor in Google…
pschatzmann · 10. January 2022 at 18:52
I haven’t used the built in microphone so far.
Please note that the driver provides the method es8388_set_mic_gain(es_mic_gain_t gain) to control the gain.