As you might know from my last posts I am currently extending my Arduino Audio Tools library to support the AI Thinker Audio Kit which is based on the ES8388 audio chip.
In my Arduino Audio Tools we have all ingredients to turn our ESP32 AudioKit into a simple synthesizer with just a few lines of code:
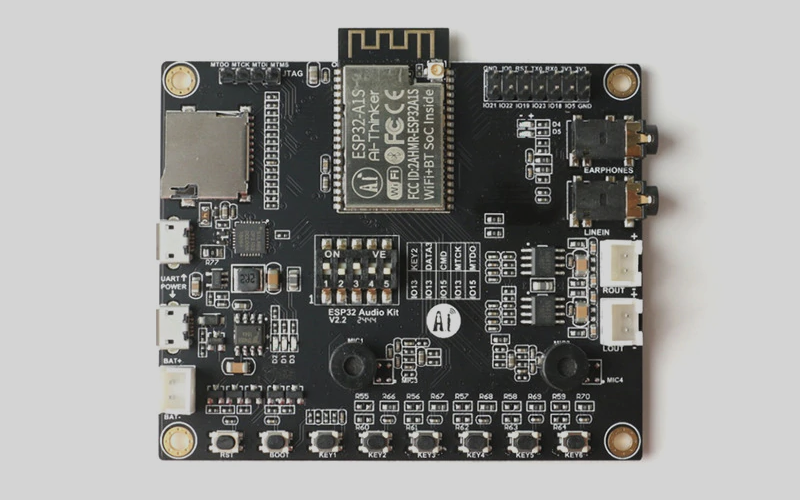
Naturally you can use this functionality on any other Processor. You just need to replace the output object e.g. with I2SStream, but because I am tired of soldering or putting together the connections on a breadboard I am using the AudioKit:
The First Arduino Sketch
We just start with a simple generation of a C3 note:
#include "AudioTools.h"
#include "AudioLibs/AudioKit.h"

AudioKitStream kit;
SineWaveGenerator<int16_t> sine;
GeneratedSoundStream<int16_t> in(sine);
StreamCopy copier(kit, in);

void setup() {
  AudioLogger::instance().begin(Serial,AudioLogger::Warning);

  // Setup output
  auto cfg = kit.defaultConfig(TX_MODE);
  kit.setVolume(80);
  kit.begin(cfg);

  // Setup sound generation based on AudioKit settings
  sine.begin(cfg, N_C3);
  in.begin(cfg);
}

// copy the data
void loop() {
  copier.copy();
  kit.processActions();
}
The logic is pretty simple: We use generated sound stream and copy the sound to the AudioKit (I2S output)! This is implemented with a GeneratedSoundStream together with a SoundGenerator.
Supporting Buttons
Next we want to use the buttons to play individual notes:
void actionKeyOn(bool active, int pin, void* ptr){
  int freq = *((int*)ptr);
  sine.setFrequency(freq);
  in.begin();
}

void actionKeyOff(bool active, int pin, void* ptr){
  in.end();
}

// We want to play some notes on the AudioKit keys
void setupActions(){
  // assign buttons to notes
  auto act_low = AudioActions::ActiveLow;
  static int note[] = {N_C3, N_D3, N_E3, N_F3, N_G3, N_A3}; // frequencies
  kit.audioActions().add(PIN_KEY1, actionKeyOn, actionKeyOff, act_low, &(note[0])); // C3
  kit.audioActions().add(PIN_KEY2, actionKeyOn, actionKeyOff, act_low, &(note[1])); // D3
  kit.audioActions().add(PIN_KEY3, actionKeyOn, actionKeyOff, act_low, &(note[2])); // E3
  kit.audioActions().add(PIN_KEY4, actionKeyOn, actionKeyOff, act_low, &(note[3])); // F3
  kit.audioActions().add(PIN_KEY5, actionKeyOn, actionKeyOff, act_low, &(note[4])); // G3
  kit.audioActions().add(PIN_KEY6, actionKeyOn, actionKeyOff, act_low, &(note[5])); // A3
}

void setup() {
  ...
  // activate keys
  setupActions();
}

// copy the data
void loop() {
  copier.copy();
  kit.processActions();
}
We use the AudioActions to assign the actionKeyOn() and actionKeyOff() methods that will be provided with the frequency. When a key is pressed we set the frequency and switch the sound on. When it is released we just switch the sound off again.
An Simple Improvement: Using ADSR
So far, our buttons were just switching the sound on and off.
In sound and music, an envelope describes how a sound changes over time. The most common form of envelope generator is controlled with four parameters: attack, decay, sustain and release (ADSR). Fortunately we have an implementation available.
First we need to set up AudioEffects as follows:
SineWaveGenerator<int16_t> sine;
AudioEffects effects(sine);
ADSRGain adsr(0.001,0.001,0.5, 0.005);
GeneratedSoundStream<int16_t> in(effects);
We can to add the ADRS to the effects in the setup() method:
void setup(){
...
   effects.addEffect(adsr);
...
}
Finally we change the key action methods:
void actionKeyOn(bool active, int pin, void* ptr){
  int freq = *((int*)ptr);
  sine.setFrequency(freq);
  adsr.keyOn();
}

void actionKeyOff(bool active, int pin, void* ptr){
  adsr.keyOff();
}
Adding More Effects
Having now this basic setup that supports effects, it is quit simple to add additional sound effects and control them with parameters. You can find an example how to do this in one of my prior posts and here is a link to the available effects implementations.
Adding Midi Support
Adding MIDI support is also not too complicated with my Arduino Midi Library. We just need to define our own MidiAction handler – which is pretty much using the same code that we already know from handling the AudioKit keys. By adding the MidiBleServer we can process now midi commands via BLE from a MIDI Keyboard.
#include <Midi.h>

class SynthAction : public MidiAction {
    public:
        void onNoteOn(uint8_t channel, uint8_t note, uint8_t velocity) {
           int frq = MidiCommon::noteToFrequency(note);
           sine.setFrequency(freq);
           adsr.keyOn();
        }
        void onNoteOff(uint8_t channel, uint8_t note, uint8_t velocity) {
           adsr.keyOff();
        }
        void onControlChange(uint8_t channel, uint8_t controller, uint8_t value) {}
        void onPitchBend(uint8_t channel, uint8_t value) {}
} action;

MidiBleServer ble("MidiServer", &action);
Final Conclusions
The Arduino Audio Tools library has all, what is needed to build some powerful audio applications with just a few lines of code.
The presented design is using just one simple input to output stream to generate a sound with different frequencies. On a regular instrument we can play however multiple tones at the same time. In order to deal with this, we will need to add some additional logic – but that’s the topic for one of my next blog …
Source Code
The (potentially updated) source code can be found on Github.
– Step 1 – Basic Example
– Step 2 – ADSR
– Step 3 – Midi

5 Comments
Hugo Franco · 26. May 2022 at 21:23
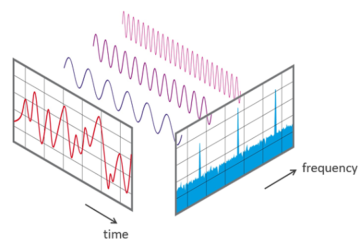
good morning, your git repository has helped me a lot!, but I have a question, there you have an example of fft and I would like to send the frequency to visualize it in a dashboard like thinger.io or freeboard, when putting something in the loo next to the copier the process stops working, do you know what it could be?
#include <WiFi.h>
#include <ThingerWifi.h>
#include <ThingerESP32.h>
#include “AudioTools.h”
#include “AudioLibs/AudioKit.h”
#include “AudioLibs/AudioRealFFT.h” // or AudioKissFF
//Wi – fi
const char* ssid = “ssid”;
const char* password = “password”;
ThingerESP32 thing(“user”, “ESPAUDIOKIT”, “?spI4xJ&sk2DOVc”);
AudioKitStream kit; // Audio source
AudioRealFFT fft; // or AudioKissFFT
StreamCopy copier(fft, kit); // copy mic to tfl
int channels = 2;
int samples_per_second = 44100;
int bits_per_sample = 16;
float value=0;
int frecuency = 440;
// display fft result
void fftResult(AudioFFTBase &fft){
auto result = fft.result();
if (result.magnitude>100){
Serial.println(result.frequency);
frecuency = result.frequency;
thing["fft"] >> outputValue(String(frecuency));}
}
void setup() {
AudioLogger::instance().begin(Serial, AudioLogger::Warning);
Serial.begin(115200);
WiFi.mode(WIFI_STA);
delay(1000);
Serial.print(“Conectando a -> “);
//me conecto a la red WiFi
WiFi.begin(ssid,password);
while (WiFi.status() != WL_CONNECTED){
Serial.print(“.”);
delay(250);
}
Serial.print(“Mi ip es -> “);
Serial.println(WiFi.localIP());
// setup Audiokit
auto cfg = kit.defaultConfig(RX_MODE);
cfg.input_device = AUDIO_HAL_ADC_INPUT_LINE1;
cfg.channels = channels;
cfg.sample_rate = samples_per_second;
cfg.bits_per_sample = bits_per_sample;
kit.begin(cfg);
// Setup FFT
auto tcfg = fft.defaultConfig();
tcfg.length = 8192;
tcfg.channels = channels;
tcfg.sample_rate = samples_per_second;
tcfg.bits_per_sample = bits_per_sample;
tcfg.callback = &fftResult;
fft.begin(tcfg);
}
void loop() {
copier.copy();
thing.handle();
}
pschatzmann · 26. May 2022 at 21:31
Your approach only works when you just add a very short delay.
I think a better way to display the result is to move the display logic to a separate task.
José Daniel Herrera Gomariz · 26. April 2022 at 11:52
Hello
Excellent work, thank you very much for the contribution.
I have a ESP32 Audio-kit based on the ES8388, but I’m not sure which board to select in the IDE, none appears as Audio-Kit or something similar, I’ve tried a generic ESP32-Dev and it works, but I don’t know if there is a more appropriate one, Ai-thinker esp32-cam maybe?
Thanks again.
pschatzmann · 26. April 2022 at 12:57
I think this has been already answered in the FAQ: https://github.com/pschatzmann/arduino-audiokit/wiki
José Daniel · 26. April 2022 at 19:19
Oh! It was pretty clear…
Thank you!