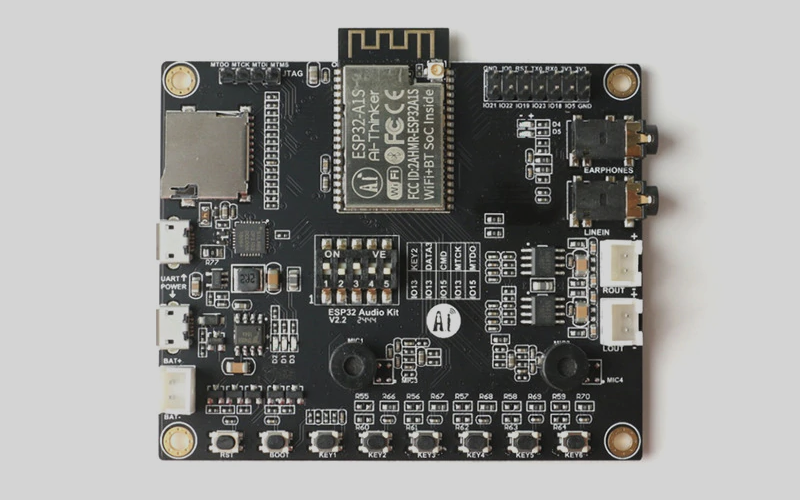
As you might know from my last posts I am currently extending my Arduino Audio Tools library to support the AI Thinker Audio Kit which is based on the ES8388 audio chip.
.
Originally I was of the opinion that the program logic for reading of the GPIO pins and the processing of the related actions should belong into a specific Arduino sketch and should not be part of an Audio Framework.
The Audio Kit made me revise this because I think that an Arduino Sketch should be as concise as possible. Therefore I have created the AudioActions class that has been integrated into the AudioKit.
Since the Audio Kit does not have any display, I think to use TTS is a good choice to feed back information to the user.
Here is the example:
Arduino Sketch
#include "flite_arduino.h"
#include "AudioTools.h"
#include "AudioDevices/ESP32AudioKit/AudioKit.h"

using namespace audio_tools;

AudioKitStream kit;
Flite flite(kit);

void button1(){
  flite.say("Button One");
}
void button2(){
  flite.say("Button Two");
}
void button3(){
  flite.say("Button Three");
}
void button4(){
  flite.say("Button Four");
}

// Arduino setup
void setup(){
  Serial.begin(115200);

  auto cfg = kit.defaultConfig();
  cfg.bits_per_sample = 16;
  cfg.channels = 1;
  cfg.sample_rate = 8000;
  kit.begin(cfg);

  // Assign pins to methods
  kit.addAction(PIN_KEY1, button1);
  kit.addAction(PIN_KEY2, button2);
  kit.addAction(PIN_KEY3, button3);
  kit.addAction(PIN_KEY4, button4);

  // example with actions using lambda expression
  auto down = []() { flite.say("Volume down"); kit.volumeDown(); };
  kit.addAction(PIN_KEY5, down);
  auto up = []() { flite.say("Volume up"); kit.volumeUp();  };
  kit.addAction(PIN_KEY6, up);

  // we are ready to process actions now
  flite.say("The application has started. Please push a button to select the function");

}

// Arduino Loop
void loop() {
  kit.processActions();
}
You just need to define you handler methods (button1, button2…) and assign them to the GPIO pins. The PIN_KEY5 and PIN_KEY6 have been predefined in the AudioKitStream to handle the volume. But you can overwrite this with your own methods – as demonstrated in the sketch.
I think it could not be easier then this!
Source Code
The source code for this example can also be found on Github. Please note that this example was working at the time of publishing. If you want to try it out please use this (potentially updated) example.
Dependencies
You need to install the following libraries:
Final Comments
I was quite happy with the AudioKit so far, but after some more trials I noted that the Kit has quite some design bugs: One of them is that there are pin conflicts: When the SD card is activated the key 1 and key 2 do not work any more!
13 Comments
Viska · 27. June 2026 at 15:54
I appreciate that the author also points out a real hardware limitation: enabling the SD card disables the functionality of Key 1 and Key 2 because of pin conflicts. Mentioning this kind of issue makes the article much more practical for developers who plan to use the board in actual projects.
Paul · 8. May 2023 at 14:22
I have a missing library missing, I’ve installed all the Dependencies. But get “Compilation error: AudioDevices/ESP32AudioKit/AudioKit.h: No such file or directory” I can’t find AudioKit.h anywhere.
pschatzmann · 8. May 2023 at 14:26
The blogs represent the situation of writing, which might have changed in the meantime.
Please use the updated version from Github!
Tuxic · 20. April 2023 at 18:57
I recently bought an AIThinker ESP32 Audio Kit. I cannot find any information about the version of this
board: Below the dip switch there is shown the following:
ESP32 Audio Kit
V2.2 A24&
On the back of the black (no bare copper traces) pcb of the antenne there is shown:
ESP32-A1s
B2 A8 (or AB…this looks like a printed 7-segment display)
Running a I2C scanner on the board prints “no I2C devices found”.
How can I configure this board?
Tuxic · 19. April 2023 at 5:03
I just received my ESP32 Audio Kit v2.2 yesterday. Now I am a little confused while trying to identify, what I have got an whether it needs further identification at all.
The pcb of the antenna of the ESP32 module has a printing at the back saying
ESP32
B2 48
…which I cannot find anywhere on the internet.
What kind of board did I receive?
pschatzmann · 19. April 2023 at 8:17
Please read: https://github.com/pschatzmann/arduino-audiokit
Facu · 30. May 2022 at 0:15
Hi, I would like to ask about the DIP switches of the board, I have been trying to figure out the purpose of these DIP switches, I guess that are used to control the SD card or the JTAG.
Thank you for your work, it’s amazing!
pschatzmann · 30. May 2022 at 12:33
You find the use at the legend which is printed on the right of the switches. In a nutshell is defines how gpio13 and gpio15 are used.
In a nutshell it is basically for choosing to use the SD drive or JTAG.
Ondrej · 25. March 2022 at 13:01
Hi!
I want to create a small application with a ESP32 Audio kit as is on th epicture at the top.
I’m confused, how to approach the arduino sketch.
I updated the boards definitions on version 2.0.2, but i don’t know, which board to choose.
After that, I want to play specific short mp3 sound based on input signal, like a pulse.
Would be someone so kind and help me setup the arduino project?
Thank you, very much.
pschatzmann · 25. March 2022 at 13:20
If you have an AI Thinker Audiokit 2.2 I suggest that you look at the Number next to the V2.2 and make an educated guess. If the selected number is not working try the other 2…
Qiang · 24. March 2022 at 1:55
Could you share the specs of resistor or capacitor above the buttons? My board has some empty slots above some of the buttons and four buttons not working…
Trixole · 17. March 2022 at 2:08
I know this is probably out of topic, but how can I use an I2C LCD with the board together? I tried many things to get it to work but I can’t get the headphone output and the LCD to work at the same time!
pschatzmann · 17. March 2022 at 10:35
I have never tried, but I think that I can recall having read that the issue might be with the pullup resistors.
I suggest that you try to use some external pullup resistors and double check with the board_pins_config.c and board_def.h for the pin conflits.