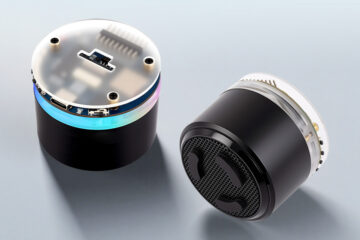
In order to test the USB functionality of the ESP32-S3, I bought the following camera/microphone board:

Before testing the USB I implemented and executed the following test cases for each hardware component:
- Testing the user button
- Testing the LED
- Testing the Color LED
- Testing the SD
- Testing the SDMMC
- Testing the PSRAM
- Testing the Camera
- Testing the Microphone
Here is a summary of the limitations/issues that I have found:
- I could not make the 4 pin SDMMC to work.
- The microphone just provides noise
- The board has no Boot button, so you can not set the board easily into upload mode. Here is the work around:
- connect GND with Pin 0
- press and release the SWT2 (Reset/EN button)
- disconnect Pin 0
My first USB tests with TinyUSB for Video and Audio were failing, so I need to look into this in more detail.


1 Comment
galank · 3. January 2026 at 11:15
/**
* ESP32-S3 WORKING FEATURES ONLY
* Menggunakan hanya fungsi yang terbukti berhasil
*/
#include
#include
#include “driver/i2s.h”
#define I2S_WS 2
#define I2S_SD 41
#define I2S_SCK 42
#define LED_PIN 21
WebServer server(80);
void setupWiFiAP();
void setupI2SMicrophone();
void setupWebServer();
void setup() {
Serial.begin(115200);
pinMode(LED_PIN, OUTPUT);
Serial.println(“\n=== ESP32-S3 WORKING MODULE ===”);
Serial.println(“Fitur yang berhasil:”);
Serial.println(“1. WiFi ✓”);
Serial.println(“2. GPIO/LED ✓”);
Serial.println(“3. I2S (microphone) ✓”);
Serial.println(“4. Web Server ✓”);
// 1. Setup WiFi Access Point
setupWiFiAP();
// 2. Setup I2S Microphone
setupI2SMicrophone();
// 3. Setup Web Server
setupWebServer();
Serial.println(“\nModule ready!”);
Serial.print(“Connect to WiFi: “);
Serial.println(WiFi.softAPIP());
}
void setupWiFiAP() {
const char* ssid = “ESP32-S3-Module”;
const char* password = “12345678”;
WiFi.softAP(ssid, password);
Serial.print(“AP IP address: “);
Serial.println(WiFi.softAPIP());
}
void setupI2SMicrophone() {
i2s_config_t i2s_config = {
.mode = (i2s_mode_t)(I2S_MODE_MASTER | I2S_MODE_RX),
.sample_rate = 16000,
.bits_per_sample = I2S_BITS_PER_SAMPLE_32BIT,
.channel_format = I2S_CHANNEL_FMT_ONLY_LEFT,
.communication_format = I2S_COMM_FORMAT_I2S,
.intr_alloc_flags = ESP_INTR_FLAG_LEVEL1,
.dma_buf_count = 4,
.dma_buf_len = 1024,
.use_apll = false,
.tx_desc_auto_clear = false
};
i2s_pin_config_t pin_config = {
.bck_io_num = I2S_SCK,
.ws_io_num = I2S_WS,
.data_out_num = -1,
.data_in_num = I2S_SD
};
i2s_driver_install(I2S_NUM_0, &i2s_config, 0, NULL);
i2s_set_pin(I2S_NUM_0, &pin_config);
Serial.println(“I2S Microphone initialized”);
}
void setupWebServer() {
server.on(“/”, []() {
String html = “”;
html += “ESP32-S3 Module Control”;
html += “WiFi: Connected”;
html += “LED ON “;
html += “LED OFF”;
html += “setInterval(()=>fetch(‘/audio’).then(r=>r.text()).then(t=>document.getElementById(‘audio’).innerText=’Audio Level: ‘+t),500)”;
html += “”;
html += “”;
server.send(200, “text/html”, html);
});
server.on(“/led/on”, []() {
digitalWrite(LED_PIN, HIGH);
server.send(200, “text/plain”, “LED ON”);
});
server.on(“/led/off”, []() {
digitalWrite(LED_PIN, LOW);
server.send(200, “text/plain”, “LED OFF”);
});
server.on(“/audio”, []() {
int16_t buffer[128];
size_t bytes_read;
i2s_read(I2S_NUM_0, buffer, sizeof(buffer), &bytes_read, 0);
int maxAmplitude = 0;
for(int i = 0; i > 16);
if(val > maxAmplitude) maxAmplitude = val;
}
server.send(200, “text/plain”, String(maxAmplitude));
});
server.begin();
Serial.println(“HTTP server started”);
}
void loop() {
server.handleClient();
delay(2);
}