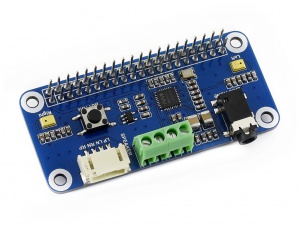
The WM8960 based boards are quite popular as Audio Modules for the Rasperry Pi and I had one of these laying around. So I had it always on my to-do list to extend my AudioTools library to support this audio chip as well, so that it can be used in Arduino.
I started last year to convert the audio-codec-wm8960 library provided by Infinion by making sure that the i2c calls are using the Wire library and this week I decided to bring it to an end.
But it turned out to be more difficult then initially thought. Whatever I did, I was getting error messages when I wanted to write to the registers of the wm8960! I tried to google the topic when I found that in the meantime Sparkfun was providing an Arduino library as well. So I tried this one, but with the same result: I was only getting errors!
When I started to reduce the speed by calling Wire.setClock(10000) things started to improve slightly, so extended the logic to retry to update the register until it succeeds, which was turning out to be quite reliable. Today I replaced the Jumper Cables with shorter ones and this did the trick!
You can use the WM8960Stream class to read audio data from the microphone or write audio data to the Amplifier.
Arduino Sketch
Here is a simple Arduino test sketch.
#include "AudioTools.h"
#include "AudioLibs/WM8960Stream.h"

uint16_t sample_rate=44100;
uint8_t channels = 2;                                      // The stream will have 2 channels
SineWaveGenerator<int16_t> sineWave(32000);                // subclass of SoundGenerator with max amplitude of 32000
GeneratedSoundStream<int16_t> sound(sineWave);             // Stream generated from sine wave
WM8960Stream out;
StreamCopy copier(out, sound);                             // copies sound into i2s

// Arduino Setup
void setup(void) {
  // Open Serial
  Serial.begin(115200);
  while(!Serial);
  AudioLogger::instance().begin(Serial, AudioLogger::Warning);

  // setup wire on pins 19 and 21
  Wire.begin(19, 21);
  Wire.setClock(10000);


  // start I2S
  Serial.println("starting I2S...");
  auto config = out.defaultConfig(TX_MODE);
  config.sample_rate = sample_rate;
  config.channels = channels;
  config.bits_per_sample = 16;
  config.wire = &Wire;
  // use default i2s pins
  //config.pin_bck = 14;
  //config.pin_ws = 15;
  //config.pin_data = 22;

  if (!out.begin(config)){
    stop();
  }

  // Setup sine wave
  sineWave.begin(channels, sample_rate, N_B4);
  Serial.println("started...");
}

// Arduino loop - copy sound to out
void loop() {
  copier.copy();
}
This (potentially updated) example can be found on Github.
And last but not least, here is the information on how to connect the different modules.
1 Comment
miou · 11. December 2023 at 12:52
Hello,
I have the WM8960 Stereo CODEC Audio Module from waveshare and I tried to test the WM8960Stream class.
The audio sinks examples worked fine by just replacing the I2SStream with the WM8960Stream and setup wire on pins 19 and 21
Wire.begin(19, 21);
Wire.setClock(10000);
Nevertheless I didn’t manage to make audio source examples to work with the integrated microphone or the headphone microphone (4 segment 3,5mm jack) .
There is also no audio source example for wm8960.
Could you provide a simple audio source example for this device?